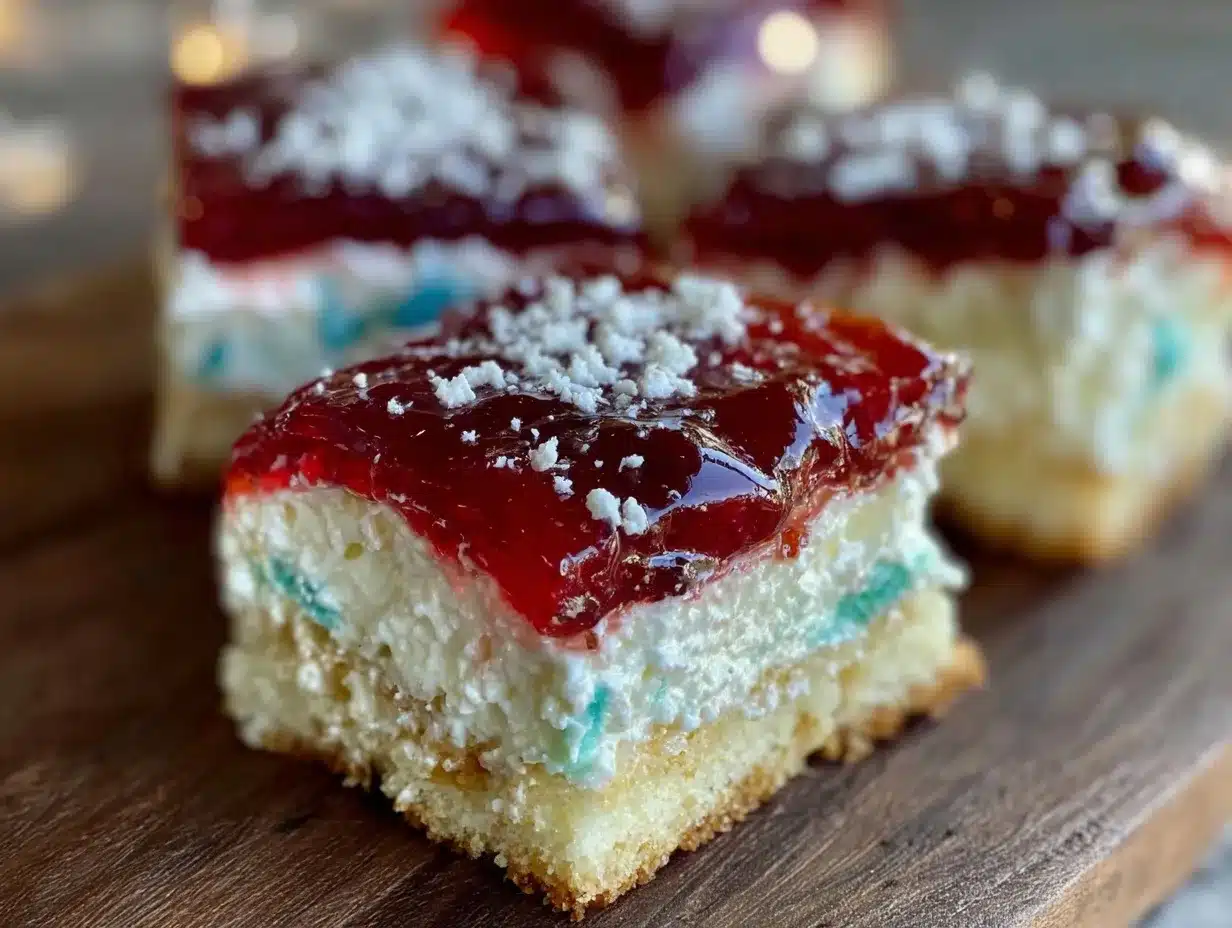
She had just taken her second helping of the Perfect Triple Layered Red White and Blue Poke Cake, and honestly, I was a little surprised. I mean, I put this recipe together on a whim for a casual Fourth of July get-together, not expecting much more than a pretty dessert on the table. But watching her lick the last bit of whipped cream off her plate made me realize this cake had more magic than I thought. The layers of red velvet, creamy white filling, and blueberry glaze were a real showstopper, but it was that moment of pure joy from my kid that cemented this recipe in my regular rotation.
Now, poke cakes aren’t new to me. I’d made plenty of them before, but this triple-layered version? It’s a playful twist that somehow feels festive without being fussy. The colors remind me of summer fireworks and backyard barbecues, but the texture—oh, the texture—makes it feel like a comforting hug after a long day. The poke cake’s moist crumb soaked with sweetened condensed milk and blueberry syrup is just the kind of treat that gets everyone’s attention at the dessert table. It’s funny how a simple moment, like a kid asking for cake twice in a row, can reveal a recipe’s true worth. And that’s why this red, white, and blue poke cake isn’t just a holiday dessert—it’s become a favorite for those times when I want to bring a bit of celebration, no matter the day.
So, the promise here isn’t just a visually stunning treat, but a recipe that’ll get quietly requested again and again (sticky fingers included). It’s a recipe I trust to deliver smiles and keep things easy, especially when I’m juggling summer plans and last-minute guests. This cake’s charm lies in its simplicity and that unmistakable triple-layered pop of color—and maybe, just maybe, a little in the way my daughter’s eyes light up with each bite.
Why You’ll Love This Perfect Triple Layered Red White and Blue Poke Cake Recipe
This triple-layered red white and blue poke cake is honestly one of those recipes that feels both special and totally doable. I’ve tested it through multiple summer parties and casual family dinners, and every time it gets a thumbs-up from the crew, no matter their age or dessert preferences. Here’s why it’s a keeper:
- Quick & Easy: Despite looking fancy, this cake comes together in just about an hour from start to finish. Perfect for those last-minute celebrations or when you want something festive but fuss-free.
- Simple Ingredients: No need for specialty stores here. The pantry staples like sweetened condensed milk, boxed cake mix, and frozen blueberries mean you can whip this up with what you probably already have.
- Perfect for Summer Gatherings: Whether it’s Independence Day, Memorial Day, or a casual weekend barbecue, this cake fits right in with the season’s patriotic spirit.
- Crowd-Pleaser: Kids love the colors and creaminess, while adults appreciate the balance of flavors and the lightness of the whipped topping.
- Unbelievably Delicious: The moisture from poking the cake and pouring in the blueberry syrup keeps it soft and bursting with flavor. The layers work together to create a dessert that’s refreshing but indulgent.
What makes this recipe stand out is the layering technique combined with the poke cake method. Instead of just one layer, three distinct layers come together for a dramatic effect—red velvet, creamy white filling, and a vibrant blueberry syrup. The blueberry glaze isn’t just for looks; it adds a fresh tang that cuts through the sweetness, making every bite balanced and interesting.
Also, I’ve played around with the whipped topping—using real whipped cream rather than the usual frosting—to keep it light and airy. It’s the kind of dessert that feels just right after a heavy meal, not too rich but still satisfying. Honestly, it’s the kind of cake that makes you close your eyes for a second and savor that perfect bite.
For your next celebration, whether it’s a laid-back cookout or a festive brunch, this red white and blue poke cake is a reliable recipe that brings that little extra “wow” factor without the stress.
What Ingredients You Will Need
This recipe uses simple, wholesome ingredients to deliver bold flavor and a satisfying texture without any fuss. Most of these are pantry staples or easy to find frozen items, making it a breeze to put together even at the last minute.
- For the Red Velvet Cake Layers:
- 1 box red velvet cake mix (around 15.25 oz / 432 g), plus ingredients called for on the box (usually eggs, oil, and water)
- Optional: 1 tablespoon cocoa powder (for a richer chocolate note)
- For the Poke and Filling:
- 1 can (14 oz / 396 g) sweetened condensed milk (this adds that signature moistness and creaminess)
- 8 oz (225 g) cream cheese, softened (for a tangy smooth filling layer)
- 1 cup (240 ml) heavy whipping cream, chilled (for homemade whipped topping)
- 1/4 cup (30 g) powdered sugar (to sweeten the whipped cream)
- 1 teaspoon vanilla extract
- For the Blueberry Layer:
- 2 cups (300 g) frozen blueberries (fresh can work in summer, but frozen are easier year-round)
- 1/3 cup (67 g) granulated sugar
- 1 tablespoon lemon juice (for brightness)
- 1 teaspoon cornstarch mixed with 2 teaspoons water (to thicken the blueberry syrup)
A quick note on brands: for the cream cheese, I prefer Philadelphia for its smooth texture and tang. For the canned sweetened condensed milk, brands like Eagle Brand work well and give a consistent sweetness without being overly cloying. Also, if you need a gluten-free option, try swapping the red velvet cake mix for a gluten-free version—many stores carry a reliable brand that won’t compromise texture.
Substitutions: If dairy is a concern, you can swap heavy cream for coconut cream (chilled and whipped) and use a dairy-free cream cheese alternative. The blueberry layer can be adapted with mixed berries if you want to switch it up for seasonal freshness.
Equipment Needed
- 9×13 inch (23×33 cm) baking pan – standard size works perfectly to hold all three layers
- Mixing bowls – one large for the cake batter, one medium for the whipped cream
- Electric mixer or stand mixer – makes whipping the cream and cream cheese mixture much easier and smoother
- Small saucepan – for simmering the blueberry sauce
- Measuring cups and spoons – for accuracy, especially with the cornstarch and liquids
- Toothpick or skewer – to poke holes in the cake layers for the syrup
- Rubber spatula – great for folding and smoothing the filling layers
If you don’t have a mixer, no worries. Whipping cream by hand takes a bit longer—about 5 to 7 minutes with a whisk, but doable if you have some elbow grease. For the baking pan, if you only have round pans, you can bake the cake in two 9-inch rounds and layer them carefully in a springform pan or assemble in a large dish.
Keep your pans greased well or lined with parchment paper to help with easy removal and cleanup. I’ve tried silicone mats in the past, but parchment always gives me a more reliable release for this kind of moist cake.
Preparation Method
- Preheat your oven to 350°F (175°C). Grease and flour your 9×13 inch pan or line it with parchment paper. This step ensures the cake doesn’t stick and bakes evenly.
- Prepare the red velvet cake batter according to the box instructions, adding in the optional tablespoon of cocoa powder if you want a richer flavor. Mix just until combined to avoid overworking the batter.
- Pour the batter evenly into the pan. Bake for 28-32 minutes or until a toothpick inserted in the center comes out with a few moist crumbs. Don’t overbake; this cake needs to stay moist for the poke step.
- While the cake bakes, prepare the blueberry syrup: In a small saucepan, combine frozen blueberries, sugar, and lemon juice. Simmer over medium heat for 8-10 minutes, mashing some berries gently with the back of a spoon to release juice.
- Mix cornstarch slurry (cornstarch + water) and stir it into the simmering blueberries. Cook another 2 minutes until slightly thickened. Remove from heat and let cool to room temperature.
- Once the cake is baked and still warm, use a toothpick or skewer to poke holes all over the surface, about 1 inch apart. This is the “poke” step that lets the syrup soak deep inside.
- Pour the cooled blueberry syrup evenly over the cake, letting it seep into the holes for maximum flavor and moisture. Set aside while you prepare the filling.
- For the filling layer: Beat softened cream cheese with powdered sugar and vanilla extract until smooth using a mixer. In a separate bowl, whip the heavy cream until stiff peaks form.
- Gently fold the whipped cream into the cream cheese mixture until combined, keeping it light and airy.
- Spread this white, creamy layer evenly over the soaked cake. This balances the tartness of the blueberries and adds a lovely texture contrast.
- Refrigerate the cake for at least 1 hour to let the layers set and flavors meld. This step makes the cake easier to slice and lets the cream firm up.
- Just before serving, add a final dollop of whipped cream or fresh blueberries on top for decoration if you like.
Pro tip: Don’t rush the cooling or soaking steps. The magic of the poke cake is in those flavors melding and the cake becoming ultra-moist. Also, if you notice the blueberry syrup is too runny, refrigerate it longer before pouring to avoid a watery cake.
Cooking Tips & Techniques
Making a poke cake might sound straightforward, but a few tricks can make the difference between a good cake and a memorable one.
- Don’t overbake the cake. The cake should be just set and springy to the touch. Overbaking leads to dryness, which defeats the purpose of a poke cake’s moist texture.
- Use room temperature ingredients for the cream cheese and eggs to help the batter and filling blend smoothly with no lumps.
- Whip the cream properly. Overwhipping can turn it grainy; underwhipping means it won’t hold its shape. Stiff peaks are your goal, but stop before it starts to separate.
- When poking holes, be consistent. Space them evenly, and don’t poke too deep—just enough for the syrup to soak through without breaking the cake apart.
- Simmer blueberry syrup gently. Boiling too hard can break down the fruit too much and make the syrup cloudy. A gentle simmer preserves flavor and color.
- Chill the cake. This step is crucial for the filling to set and makes slicing cleaner. Plus, it lets flavors develop, much like other chilled desserts such as the creamy vegan chocolate avocado pudding cups.
- Multitask wisely: While the cake bakes and cools, prepare the blueberry syrup and filling so everything comes together smoothly.
I remember the first time I tried skipping the chilling step—let’s just say it was a messy but tasty experience! Patience really pays off here.
Variations & Adaptations
This Perfect Triple Layered Red White and Blue Poke Cake is a versatile crowd-pleaser, but you can tweak it to suit different tastes or dietary needs with ease.
- Gluten-Free Version: Use a gluten-free red velvet cake mix or bake a homemade gluten-free red velvet base. The rest of the layers remain the same, so it’s just a simple swap.
- Vegan Adaptation: Try a dairy-free cream cheese and coconut whipped cream for the white layer, and swap the cake mix for a vegan-friendly red velvet recipe. Frozen blueberries and sweetened condensed coconut milk work well for the syrup.
- Flavor Twists: Swap the blueberry syrup for raspberry or strawberry sauce for a different berry profile. Or add a hint of almond extract to the cream cheese filling for a nutty note.
- Seasonal Changes: In summer, fresh berries work beautifully in place of frozen, adding freshness and texture. In winter, try a spiced cranberry sauce instead of blueberry for a holiday vibe.
- Alternative Cake Bases: For a fun twist, use a white or yellow cake mix instead of red velvet. It changes the look but keeps the layering effect just as stunning.
Personally, I once swapped the blueberry syrup with a tangy lemon curd layer for a sharp contrast that surprised everyone. It’s worth experimenting to find your favorite combo. For a lighter version after a heavy meal, pairing this with a fresh cucumber mint detox water from the same blog brings a refreshing balance to the dessert’s richness.
Serving & Storage Suggestions
Serve this cake chilled or slightly chilled for best texture and flavor. The creamy layers hold up beautifully when cool, and the flavors are more pronounced.
- Presentation-wise, a simple garnish of fresh blueberries and a sprig of mint adds a fresh, elegant touch.
- Pair it with a light beverage like iced tea or lemonade to balance the sweetness.
- Store leftover cake covered tightly in the refrigerator for up to 4 days. The flavors actually deepen as it sits, so leftovers can be even better!
- For longer storage, you can freeze slices wrapped well in plastic and foil for up to 2 months. Thaw overnight in the fridge before serving.
- When reheating, it’s best served cold or at room temperature. Microwaving tends to break down the whipped layers and make the cake soggy.
If you’re hosting a party, prepare the cake a day ahead to give it time to chill and set perfectly. This saves you last-minute stress and lets you enjoy the celebration more.
Nutritional Information & Benefits
This triple-layered poke cake is definitely a treat, but it also has some redeeming qualities thanks to its ingredients. A typical serving (about 1/12th of the cake) contains roughly:
| Calories | 320-350 kcal |
|---|---|
| Fat | 14-16 g |
| Carbohydrates | 45-50 g |
| Protein | 4-5 g |
| Sugar | 30-35 g |
The cream cheese adds protein and calcium, while the blueberries contribute antioxidants and vitamin C. Using frozen blueberries makes this dessert accessible year-round, providing nutrients even when fresh berries are out of season.
While this recipe contains gluten and dairy, substitutions can make it suitable for gluten-free or dairy-free diets without losing the essence of the poke cake. It’s a balanced indulgence where the sweetness is offset by the tangy cream cheese and tart blueberry layer.
From a wellness perspective, I appreciate that this recipe encourages home baking with real ingredients over processed desserts. It’s a way to enjoy something special without unnecessary additives.
Conclusion
This Perfect Triple Layered Red White and Blue Poke Cake is the kind of recipe that quietly wins hearts with its mix of vibrant colors, layered flavors, and that perfectly moist texture. It’s simple enough for a weeknight treat, yet impressive enough for holidays and celebrations. What I love most is how it invites you to get a little creative—tweaking the berry layer or switching up the cake base to suit your mood or dietary needs.
Whether you’re making this for a festive summer party or just because, it’s a recipe that feels like a small celebration in every slice. I hope it brings you those same moments of joy and sticky-fingered happiness that convinced me to keep it close. If you try it, I’d love to hear how you personalized your poke cake—comments and stories make this kitchen feel like home.
Happy baking and here’s to many more sweet moments shared around the table!
FAQs about Perfect Triple Layered Red White and Blue Poke Cake
Can I use fresh blueberries instead of frozen?
Yes! Fresh blueberries work great in season. Just reduce the cooking time slightly when making the syrup, as fresh berries release juice faster.
How far in advance can I make this poke cake?
You can prepare it up to 2 days ahead and keep it refrigerated. The flavors actually improve with time, but avoid freezing the whipped cream topping if possible.
What if I don’t have red velvet cake mix?
You can substitute with a white or yellow cake mix and add a few drops of red food coloring for the traditional look, or skip the coloring for a lighter appearance.
Is there a way to make this cake less sweet?
Reducing the powdered sugar in the filling or using unsweetened whipped cream can help. Also, try cutting back slightly on the sugar in the blueberry syrup.
Can I make this poke cake vegan?
Absolutely! Use a vegan red velvet cake recipe, dairy-free cream cheese, coconut cream for whipping, and sweetened condensed coconut milk. The blueberry layer stays the same.
Pin This Recipe!
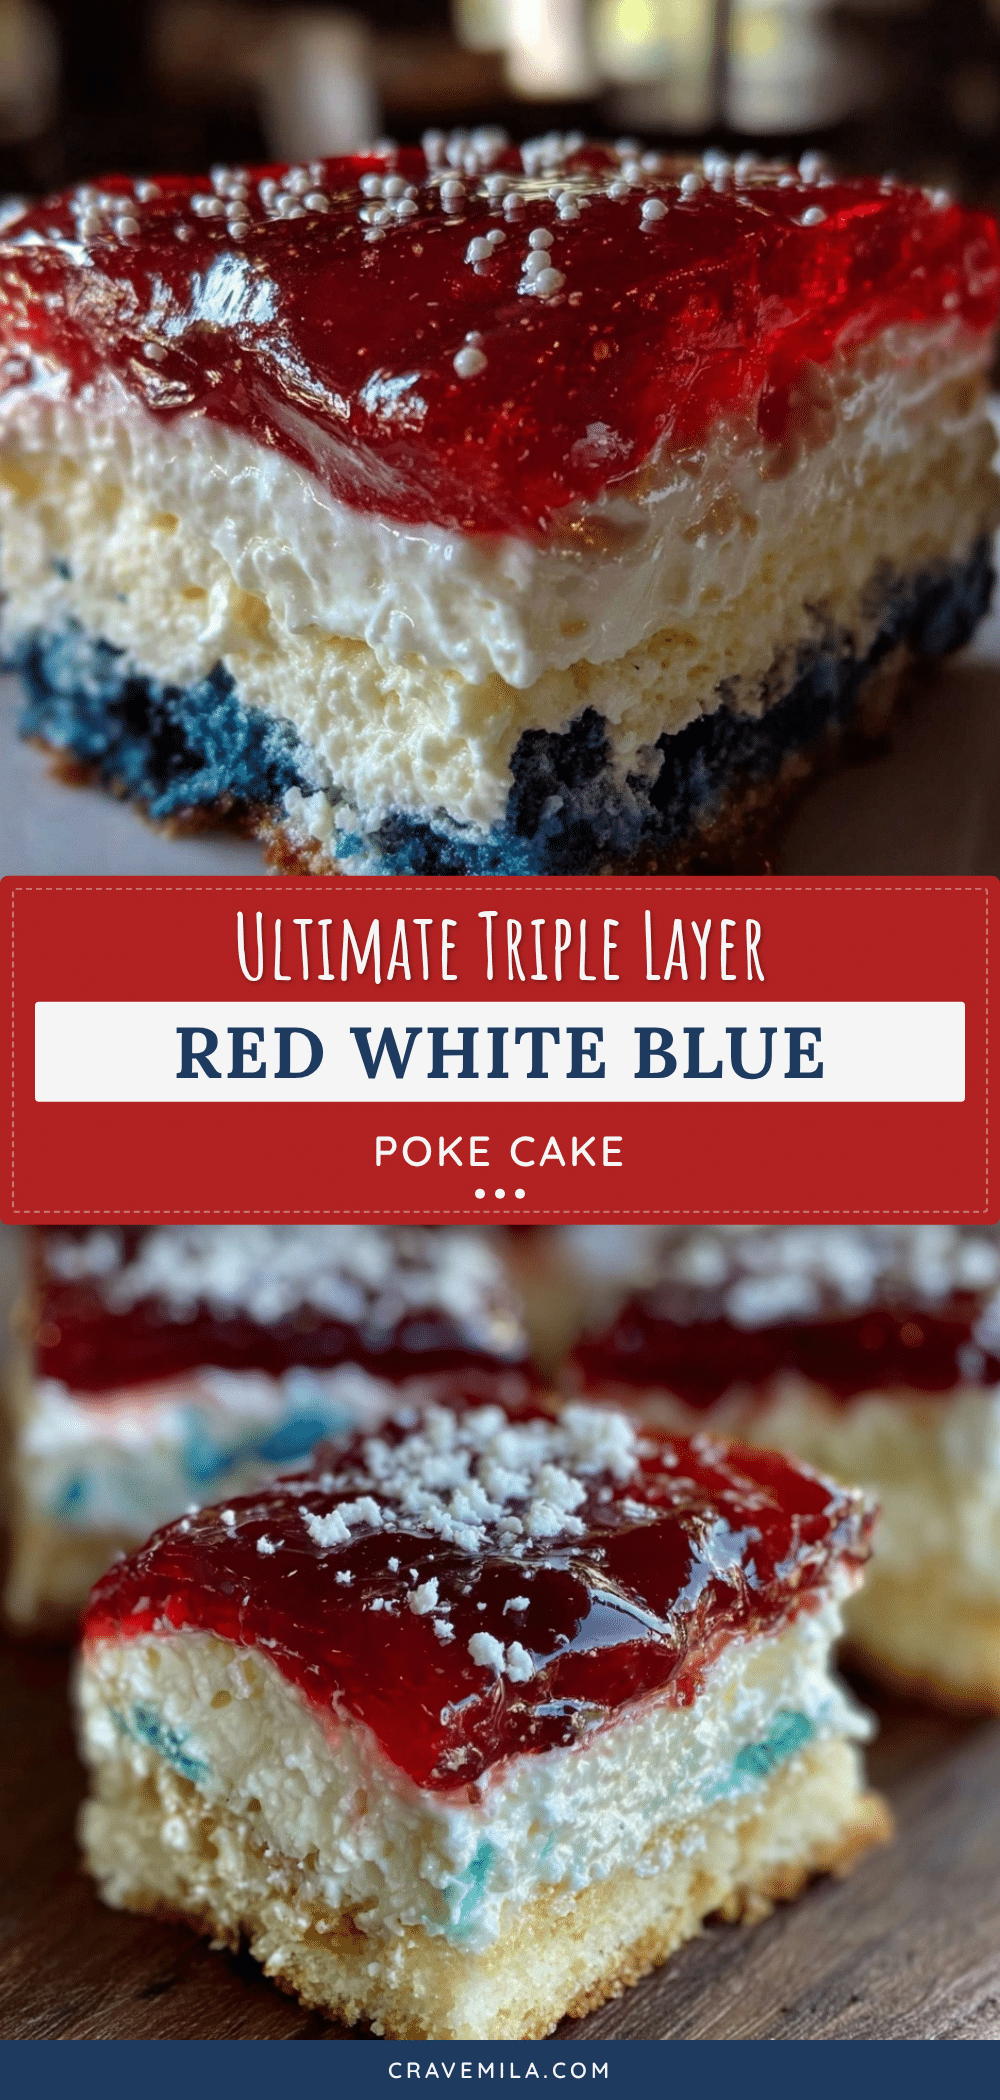
Perfect Triple Layered Red White and Blue Poke Cake
A festive and easy-to-make triple-layered poke cake featuring red velvet cake, creamy white filling, and a vibrant blueberry glaze. Perfect for summer gatherings and patriotic celebrations.
- Prep Time: 15 minutes
- Cook Time: 32 minutes
- Total Time: 1 hour 15 minutes
- Yield: 12 servings 1x
- Category: Dessert
- Cuisine: American
Ingredients
- 1 box red velvet cake mix (around 15.25 oz / 432 g), plus ingredients called for on the box (usually eggs, oil, and water)
- Optional: 1 tablespoon cocoa powder
- 1 can (14 oz / 396 g) sweetened condensed milk
- 8 oz (225 g) cream cheese, softened
- 1 cup (240 ml) heavy whipping cream, chilled
- 1/4 cup (30 g) powdered sugar
- 1 teaspoon vanilla extract
- 2 cups (300 g) frozen blueberries
- 1/3 cup (67 g) granulated sugar
- 1 tablespoon lemon juice
- 1 teaspoon cornstarch mixed with 2 teaspoons water
Instructions
- Preheat your oven to 350°F (175°C). Grease and flour your 9×13 inch pan or line it with parchment paper.
- Prepare the red velvet cake batter according to the box instructions, adding in the optional tablespoon of cocoa powder if desired. Mix just until combined.
- Pour the batter evenly into the pan. Bake for 28-32 minutes or until a toothpick inserted in the center comes out with a few moist crumbs.
- While the cake bakes, prepare the blueberry syrup: In a small saucepan, combine frozen blueberries, sugar, and lemon juice. Simmer over medium heat for 8-10 minutes, mashing some berries gently.
- Mix cornstarch slurry (cornstarch + water) and stir it into the simmering blueberries. Cook another 2 minutes until slightly thickened. Remove from heat and let cool to room temperature.
- Once the cake is baked and still warm, use a toothpick or skewer to poke holes all over the surface about 1 inch apart.
- Pour the cooled blueberry syrup evenly over the cake, letting it seep into the holes. Set aside.
- For the filling layer: Beat softened cream cheese with powdered sugar and vanilla extract until smooth using a mixer. In a separate bowl, whip the heavy cream until stiff peaks form.
- Gently fold the whipped cream into the cream cheese mixture until combined.
- Spread this white, creamy layer evenly over the soaked cake.
- Refrigerate the cake for at least 1 hour to let the layers set and flavors meld.
- Just before serving, add a final dollop of whipped cream or fresh blueberries on top for decoration if desired.
Notes
Do not overbake the cake to keep it moist for the poke step. Use room temperature ingredients for smooth batter and filling. Whip cream to stiff peaks but avoid overwhipping. Space poke holes evenly about 1 inch apart. Chill the cake for at least 1 hour before serving for best texture and flavor. If blueberry syrup is too runny, refrigerate longer before pouring. For gluten-free, use gluten-free cake mix. For dairy-free/vegan, substitute cream cheese and heavy cream with dairy-free alternatives and use sweetened condensed coconut milk.
Nutrition
- Serving Size: 1 slice (1/12th of c
- Calories: 335
- Sugar: 33
- Sodium: 320
- Fat: 15
- Saturated Fat: 9
- Carbohydrates: 48
- Fiber: 2
- Protein: 4.5
Keywords: poke cake, red velvet cake, blueberry syrup, patriotic dessert, Fourth of July cake, layered cake, easy dessert, summer dessert