Three winters ago, on a Tuesday that felt more like a Thursday, I decided to host the Super Bowl for twelve people. I had planned an intricate charcuterie board, a smoked brisket that required three hours of babysitting, and a salad that needed to stay crisp. You know that feeling when you look at your clock and realize you are already behind? I was. The oven timer was screaming, the brisket was resting, and my neighbor Dave was knocking on the door with a bottle of wine and a tray of store-bought chips.
I was supposed to be making individual sliders with premium beef and artisanal buns. But I had bought the wrong buns. They were these huge, fluffy, square sandwich rolls that were clearly meant for breakfast sandwiches or maybe giant tuna melts. They were too big for a proper slider, too soft for a heavy burger, and frankly, they were going to get soggy within minutes of assembly. I looked at the pile of leftover pulled pork, the sharp cheddar I’d grated by hand, and the jalapeños that were crying in my eyes. I grabbed a knife and started slicing those massive rolls in half horizontally.
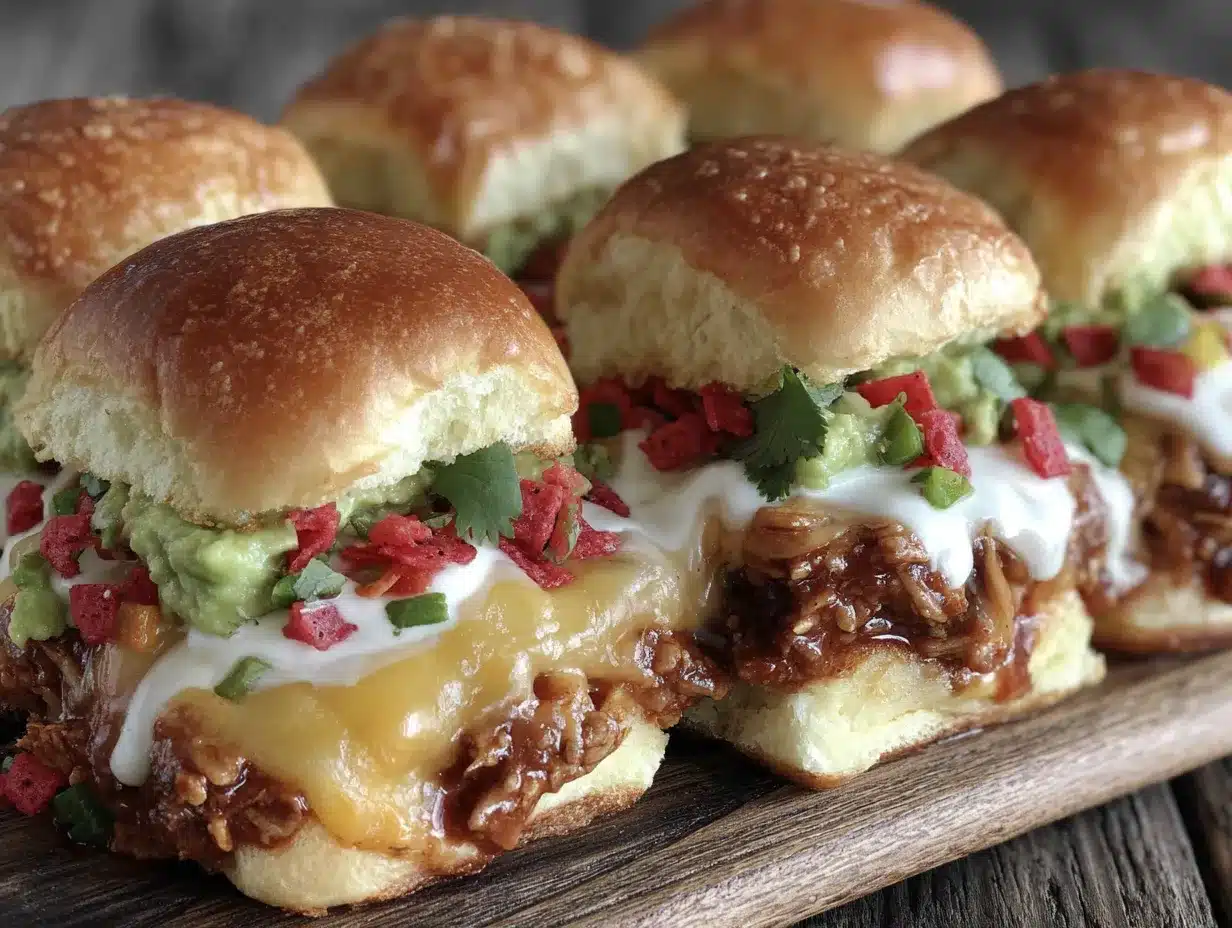
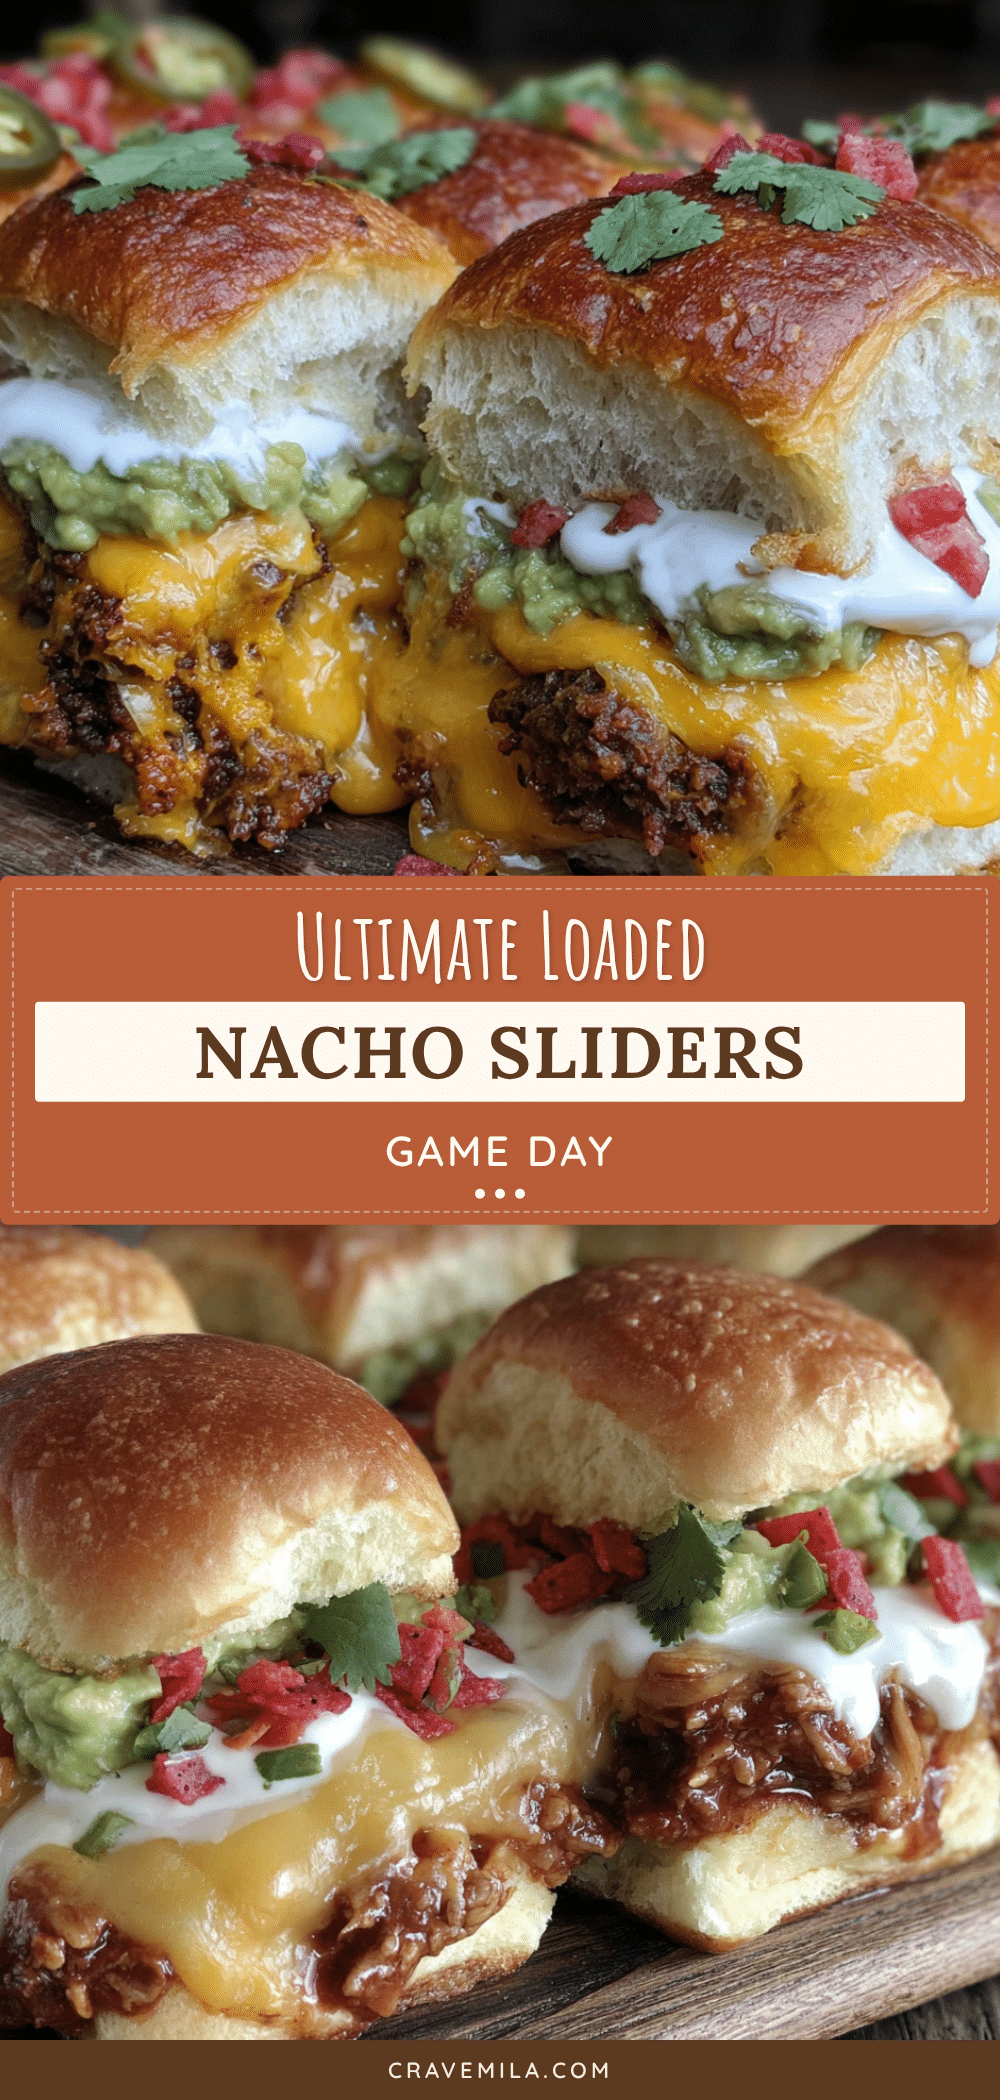
What came out was nothing like the plan — and better. I piled the meat high, drowned it in cheese, and baked the whole thing until the bread turned golden and crunchy on the outside while staying soft on the inside. It was messy. It was greasy. It was exactly what people wanted. Dave took one bite and said, “This is the only thing that matters.” I mean, honestly, let me tell you, the “Savory Loaded Nacho Sliders for Game Day” name stuck because that’s exactly what they were: nacho ingredients on slider buns. It became the star of the night, not the brisket. I still make them for every big game now, mostly because they are forgiving, delicious, and impossible to mess up.
Why You’ll Love This Recipe
There is a specific kind of magic that happens when you combine the comfort of nachos with the handheld convenience of sliders. This isn’t just about feeding a crowd; it’s about creating a dish that feels indulgent without requiring a chef’s degree. After testing this recipe over five different game days and adjusting the cheese ratios until they were just right, I can confidently say this is the ultimate party food. It strikes a perfect balance between salty, spicy, and savory that keeps your guests coming back for seconds.
- Quick & Easy: The prep time is minimal because you are using simple assembly techniques. You can have these out of the oven in under 30 minutes, which is perfect for busy weeknights or last-minute game day cravings when you forgot to buy appetizers.
- Simple Ingredients: No fancy grocery trips needed. You likely already have ground beef or pulled pork, shredded cheese, and some kind of bread in your kitchen. This recipe relies on pantry staples and freezer essentials, making it incredibly accessible.
- Perfect for Game Day: These are designed to be eaten with one hand while holding a drink or a remote. They are great for brunch, potlucks, cozy dinners, or holiday mornings when you want something hearty but fun.
- Crowd-Pleaser: Always gets rave reviews from kids and adults alike. The familiar flavors of nachos remove the intimidation factor, while the slider format makes them feel special and easy to serve.
- Unbelievably Delicious: The texture and flavor combo is next-level comfort food. The contrast between the crispy, buttery top of the bun and the gooey, hot cheese filling is what makes this recipe stand out from ordinary sliders.
What makes this recipe different from the rest is the technique of baking them as a single slab rather than individually. This allows the cheeses to melt into a unified layer that you slice apart later, creating those perfect “nacho” edges that everyone fights over. Whether it is the special technique of toasting the top buns first, or the perfectly balanced seasoning profile with cumin and chili powder, this isn’t just another version—it’s your best version. It’s the kind that makes you close your eyes after the first bite. It’s comfort food reimagined—healthier if you use turkey, faster if you use rotisserie chicken, but with the same soul-soothing satisfaction. Perfect for impressing guests without stress, or turning a simple meal into something memorable.
What Ingredients You Will Need
This recipe uses simple, wholesome ingredients to deliver bold flavor and satisfying texture without the fuss. The beauty of the Savory Loaded Nacho Sliders for Game Day lies in its flexibility. You can use what you have on hand, and the result will still be incredible. The key is to balance the moisture of the fillings with the structural integrity of the bread.
For the Slider Buns
- 12 Hawaiian Sweet Rolls or Potato Rolls: These are crucial. I recommend King’s Hawaiian for their perfect balance of sweetness and softness, which contrasts beautifully with the savory meat. You can also use dinner rolls, but avoid hard crusty bread as it won’t absorb the flavors well.
- 4 Tablespoons Unsalted Butter: Melted. This is for brushing the tops to ensure a golden, crispy finish.
- 1 Teaspoon Garlic Powder: Mixed into the butter for extra aroma.
For the Meat Filling
- 1 Pound Ground Beef (80/20 ratio): The fat content is important here for juiciness. If you want a leaner option, use 90/10, but you might need to add a splash of beef broth. Look for fresh, bright red meat, not gray or browned before cooking.
- 1 Teaspoon Cumin: Adds that classic taco/nacho warmth.
- 1 Teaspoon Chili Powder: Provides a mild heat and depth of color.
- 1/2 Teaspoon Smoked Paprika: This is a secret weapon for adding a smoky flavor without actual smoke.
- Salt and Black Pepper: To taste. Always season your meat while it cooks.
For the Toppings & Cheese
- 2 Cups Shredded Cheddar Cheese: I prefer a sharp cheddar for a stronger flavor punch. Pre-shredded cheese contains anti-caking agents that can make the melt slightly grainy, so block cheese is better if you have time to shred it yourself.
- 1 Cup Pepper Jack Cheese: For those who like a little kick. If you are sensitive to spice, swap this for Monterey Jack.
- 1/2 Cup Diced Jalapeños: Fresh or jarred. Jarred is easier and more consistent, but fresh adds a brighter crunch.
- 1/2 Cup Black Beans: Rinsed and drained. This adds fiber and texture, making the sliders more substantial.
- 1/4 Cup Salsa: Use a mild or medium salsa. Avoid chunky varieties with large pieces of onion or tomato, as they can make the buns soggy.
For the Garnish
- Green Onions: Chopped, for a fresh, oniony bite after baking.
- Sour Cream: To drizzle on top after serving.
For substitution guidance, you can use ground turkey or chicken if you prefer poultry. For a vegetarian option, swap the meat for seasoned black beans or refried beans. If you need gluten-free options, use gluten-free dinner rolls, though you may need to brush them with more butter to prevent drying out.
Equipment Needed
You don’t need a lot of fancy gear to make these sliders, but having the right tools makes the process smoother. A large skillet is essential for browning the meat evenly. I use a cast-iron skillet because it retains heat well, but a non-stick pan works just as fine if you are careful not to scratch it.
A large baking sheet is the most important piece of equipment here. You need enough space to fit all 12 rolls in a single layer. If your oven is small, you might need to bake them in two batches, but try to fit them all together for even melting. A standard 13×9 inch baking sheet is usually sufficient, but a half-sheet pan (18×13) is ideal.
For the cheese, a box grater is better than buying pre-shredded cheese. It melts more smoothly and tastes fresher. If you do buy pre-shredded, give it a quick shake in the bag to break up any clumps before using. You will also need a pastry brush or a silicone basting brush to apply the butter mixture to the tops of the buns. A regular paintbrush is a funny but effective alternative if you don’t have a kitchen one, just make sure it’s clean!
Maintain your cast-iron skillet by seasoning it regularly with oil and heat. For budget-friendly options, a simple stainless steel skillet works perfectly if you watch the heat to prevent sticking. Don’t skip the baking sheet; using a glass dish will change the cooking time and texture of the bread.
Preparation Method
- Preheat and Prep (5 minutes): Preheat your oven to 375°F (190°C). Line a large baking sheet with parchment paper or aluminum foil for easy cleanup. This step is crucial because the cheese will bubble over and burn to the pan if you don’t use a liner.
- Prepare the Butter Mixture (2 minutes): In a small microwave-safe bowl, melt the 4 tablespoons of butter. Stir in the garlic powder. Set this aside. You want the butter warm but not boiling hot.
- Prepare the Buns (2 minutes): Take your 12 slider rolls and slice them horizontally in half. You should now have 12 bottom halves and 12 top halves. Arrange the bottom halves on the prepared baking sheet, leaving a small gap between each for expansion. Do not remove the tops yet; keep them set aside on a plate.
- Cook the Meat (8-10 minutes): Heat your large skillet over medium-high heat. Add the ground beef. Break it up with a spatula as it cooks. Once the beef is browned and no pink remains, drain any excess grease. This is important; too much grease will make the buns soggy. Stir in the cumin, chili powder, smoked paprika, salt, and pepper. Cook for another minute to toast the spices. Remove from heat.
- Assemble the Base (3 minutes): Evenly distribute the seasoned meat mixture over the bottom halves of the buns. Do not pile it too high, or the sliders will be top-heavy and difficult to eat. Aim for a thin, even layer.
- Add the Cheese and Toppings (2 minutes): Sprinkle half of the cheddar and half of the pepper jack cheese over the meat. Add a spoonful of black beans and a few diced jalapeños to each slider. Top with the remaining cheese. The double layer of cheese helps hold everything together.
- First Bake (5 minutes): Place the baking sheet in the oven. Bake for 5 minutes. This melts the cheese and warms the meat without toasting the bread yet. Check the cheese; it should be mostly melted but still firm.
- Add the Tops and Final Bake (3-5 minutes): Remove the pan from the oven. Place the top halves of the buns on the sliders. Brush the tops generously with the garlic butter mixture. Return to the oven and bake for another 3-5 minutes, or until the tops are golden brown and crispy.
- Cool and Slice (2 minutes): Remove from the oven and let them cool for 2 minutes. This allows the cheese to set slightly so they don’t fall apart when you cut them. If you are using a full sheet of buns, you can cut them into individual sliders with a sharp knife or pizza cutter.
- Garnish and Serve: Sprinkle with chopped green onions and a dollop of sour cream on each slider if desired. Serve immediately while hot and gooey.
Troubleshooting Tips
- Soggy Bottoms: If your bottoms are soggy, you didn’t drain the meat enough, or you added too much salsa. Pat the meat dry with a paper towel after browning if it looks wet.
- Burnt Tops: If the butter burns before the cheese melts, cover the pan with foil for the first 5 minutes, then remove the foil to brown the tops.
- Falling Apart: Let them cool for at least 2 minutes before cutting. The cheese needs time to solidify slightly.
Cooking Tips & Techniques
One common mistake people make is overloading the sliders. It’s tempting to pile on every topping imaginable, but this leads to structural failure. Keep the layers thin and even. Another pro tip is to toast the bottom buns slightly before adding the meat. You can do this by brushing the cut side of the bottom buns with a little butter and putting them in the oven for the first 2 minutes of baking. This creates a barrier against moisture.
When browning the beef, do not stir it constantly. Let it sit for a minute to develop a nice brown crust (the Maillard reaction). This adds a deeper, richer flavor than uniformly gray meat. Also, taste the meat before assembling. If it tastes bland, add more salt. The cheese and bread will mute the seasoning, so the meat should taste slightly too salty on its own.
For consistency, use a kitchen scale to divide the meat and cheese evenly among the buns. This ensures every slider is the same size and flavor. If you are making these for a large crowd, consider doubling the recipe and baking in two pans. Rotate the pans halfway through baking for even browning.
Personal tip: I once tried using pita bread instead of rolls. It was a disaster. The pita tore and the filling spilled out. Stick to soft, squishy buns that can hold up to the weight of the toppings. Also, don’t skip the garlic butter. It’s the element that transforms a simple sandwich into a gourmet slider.
Variations & Adaptations
While the classic beef and cheese version is my favorite, these sliders are incredibly versatile. Here are a few variations I’ve tried:
- Chicken Fajita Sliders: Swap the beef for seasoned chicken breast strips. Sauté with bell peppers and onions for a colorful and lighter option. Use a Monterey Jack cheese blend.
- Vegetarian Black Bean Sliders: Use mashed black beans as the base. Add corn and cilantro for freshness. This is great for guests who don’t eat meat.
- Breakfast Nacho Sliders: Use breakfast sausage instead of beef. Add scrambled eggs and hash browns. Top with cheddar and bake until the eggs are just set.
For dietary adaptations, use gluten-free rolls for a gluten-free version. For a low-carb option, use large lettuce leaves or portobello mushroom caps instead of buns. To make it dairy-free, use a dairy-free cheese alternative, though note that the melt may not be as gooey. For a spicy kick, add diced habaneros or a dash of hot sauce to the meat mixture.
I once made these with pulled pork and a tangy BBQ sauce instead of salsa. It was a huge hit with the football fans. The sweetness of the BBQ paired well with the sharp cheddar. Feel free to experiment with different sauces and proteins to find your favorite combination.
Serving & Storage Suggestions
Serve these sliders immediately after they come out of the oven. They are best when the cheese is still hot and gooey. Pair them with a side of guacamole, a crisp green salad, or a cold beer. For presentation, arrange them on a large platter and garnish with extra green onions and cilantro.
If you have leftovers, store them in an airtight container in the refrigerator for up to 3 days. To reheat, place them in the oven at 350°F for 10 minutes, or in the microwave for 30-60 seconds. The oven method is better for maintaining the crispness of the bun. Avoid freezing them, as the bread will become mushy upon thawing.
Flavors develop over time, especially if you let the meat sit with the spices overnight. You can prep the meat mixture ahead of time and assemble the sliders just before baking. This makes game day cooking much less stressful. Just remember to bring the meat to room temperature before assembling for even cooking.
Nutritional Information & Benefits
Each slider contains approximately 250-300 calories, depending on the size of the bun and the amount of cheese used. The ground beef provides a good source of protein and iron. The cheese adds calcium and flavor. If you use turkey or chicken, you can reduce the calorie count significantly. For a lighter version, use whole wheat buns and less cheese.
These sliders are not necessarily a health food, but they can be part of a balanced diet if enjoyed in moderation. The black beans add fiber, which helps with digestion. The jalapeños contain capsaicin, which may boost metabolism slightly. Just be mindful of the sodium content from the cheese and processed meats. Always check labels if you are watching your salt intake.
Personally, I view these as a “treat” dish. They are meant to be enjoyed occasionally as a fun, social meal. Don’t stress about the macros; enjoy the flavor and the company. Balance them with a healthy salad or fruit platter to create a more balanced meal.
Conclusion
The Savory Loaded Nacho Sliders for Game Day are more than just food; they are an experience. They bring people together, they are easy to make, and they taste amazing. I love this recipe because it takes the hassle out of party planning while still delivering a dish that looks and tastes impressive. Whether you are a seasoned cook or a beginner, this recipe is foolproof and delicious.
I encourage you to customize this recipe to fit your tastes. Add more jalapeños if you like heat, or swap the beef for your favorite protein. Share your variations with me in the comments below! I love hearing how you adapt my recipes. If you make these, please tag me on social media or leave a review. Your feedback helps me create better content for you.
Thank you for visiting my blog. I hope these sliders become a staple in your game day rotation. Happy cooking, and enjoy every bite!
Frequently Asked Questions
Can I make these sliders ahead of time?
Yes, you can assemble the sliders up to 24 hours in advance. Cover them tightly with plastic wrap and refrigerate. When you are ready to eat, let them sit at room temperature for 20 minutes, then bake as directed. You may need to add 2-3 minutes to the baking time.
What kind of bread is best for sliders?
Soft, slightly sweet breads like Hawaiian rolls, potato rolls, or brioche buns work best. They hold up well to the moist fillings and toast beautifully. Avoid dense, crusty breads like baguettes.
Can I use pre-shredded cheese?
You can, but block cheese shredded at home melts better and has a fresher taste. Pre-shredded cheese contains anti-caking agents that can prevent a smooth melt.
How do I keep the sliders from falling apart?
Let them cool for 2-3 minutes after baking. This allows the cheese to set slightly. Also, avoid overloading them with too many wet ingredients like salsa or sour cream.
Can I freeze these sliders?
It is not recommended to freeze assembled sliders as the bread will become soggy. However, you can freeze the cooked meat mixture and reheat it when ready to assemble and bake.
Pin This Recipe!
Savory Loaded Nacho Sliders for Game Day
These easy, crowd-pleasing sliders combine the flavors of nachos with the convenience of sliders. Baked as a single slab for perfect melting and crispy garlic-buttered tops, they are the ultimate game day party food.
- Prep Time: 15 minutes
- Cook Time: 15 minutes
- Total Time: 30 minutes
- Yield: 12 servings 1x
- Category: Appetizer
- Cuisine: American
Ingredients
- 12 Hawaiian Sweet Rolls or Potato Rolls
- 4 Tablespoons Unsalted Butter, melted
- 1 Teaspoon Garlic Powder
- 1 Pound Ground Beef (80/20 ratio)
- 1 Teaspoon Cumin
- 1 Teaspoon Chili Powder
- 1/2 Teaspoon Smoked Paprika
- Salt and Black Pepper, to taste
- 2 Cups Shredded Sharp Cheddar Cheese
- 1 Cup Shredded Pepper Jack Cheese
- 1/2 Cup Diced Jalapeños
- 1/2 Cup Black Beans, rinsed and drained
- 1/4 Cup Salsa
- Green Onions, chopped (for garnish)
- Sour Cream (for serving)
Instructions
- Preheat oven to 375°F (190°C). Line a large baking sheet with parchment paper or foil.
- In a small bowl, melt the butter and stir in the garlic powder. Set aside.
- Slice the 12 slider rolls horizontally in half. Arrange the bottom halves on the prepared baking sheet.
- In a large skillet over medium-high heat, cook the ground beef, breaking it up with a spatula. Drain excess grease.
- Stir cumin, chili powder, smoked paprika, salt, and pepper into the beef. Cook for 1 minute to toast spices.
- Distribute the seasoned meat evenly over the bottom halves of the buns.
- Sprinkle half of the cheddar and pepper jack cheese over the meat. Add black beans and jalapeños. Top with remaining cheese.
- Bake for 5 minutes to melt the cheese.
- Remove from oven. Place top halves of buns on sliders. Brush generously with garlic butter.
- Return to oven and bake for 3-5 minutes until tops are golden brown and crispy.
- Cool for 2 minutes to allow cheese to set. Slice into individual sliders.
- Garnish with green onions and serve with sour cream.
Notes
For best results, use block cheese shredded at home for a smoother melt. Ensure meat is well-drained to prevent soggy buns. Let sliders cool for 2 minutes before cutting to help them hold together. Can be assembled up to 24 hours in advance and refrigerated.
Nutrition
- Serving Size: 1 slider
- Calories: 275
- Sugar: 3
- Sodium: 450
- Fat: 18
- Saturated Fat: 9
- Carbohydrates: 18
- Fiber: 1
- Protein: 14
Keywords: game day food, party appetizers, nacho sliders, easy recipes, crowd pleaser, beef sliders, cheesy sliders, football snacks