My younger brother swore he hated Halloween cupcakes. For years. Every October, when I’d pull out the mixing bowls and food coloring, he’d roll his eyes and mutter something about “sugary messes that look better than they taste.” I stopped trying to convince him after a while. Honestly, I figured some people just don’t get the joy of a themed dessert.
Then last year happened. I was testing this black velvet recipe on a rainy Tuesday afternoon, not even thinking about him. The kitchen smelled like rich cocoa and vanilla, and I was elbow-deep in black batter, muttering about getting the color just right. He wandered in looking for a snack, saw the cupcakes cooling on the counter, and just… stood there. For a solid minute, he stared at the spiderweb icing I was practicing. Then he grabbed one without asking. That part made me laugh.
He took a bite, and I watched his face go through this whole journey surprise, then confusion, then this quiet little smile he tried to hide. “Okay,” he said, reaching for another. “These are actually good.” That was it. No grand apology for years of cupcake-shaming. Just him, caught red-handed with black-stained lips, proving himself wrong one bite at a time.
These Spooky Black Velvet Cupcakes with Spiderweb Icing are the reason I keep making Halloween treats, even when people claim they don’t care. They’re not just about the looks though, let me tell you, the dark, dramatic crumb and that glossy web on top are pretty satisfying. It’s the way the deep chocolate flavor hits you first, followed by that tangy cream cheese frosting. Maybe you’ve been on the fence about themed baking, thinking it’s all style and no substance. I get it. But this recipe might just change your mind.
Why You’ll Love This Recipe
These aren’t your average Halloween cupcakes. I’ve tested this recipe at least a dozen times, tweaking the ratios until the texture was just right. Here’s what makes them stand out:
- Seriously Moist Crumb: The combination of buttermilk and oil keeps these cupcakes tender for days, not dry and crumbly like some velvet recipes.
- No Artificial Aftertaste: I use a specific blend of cocoa powder and black food coloring that gives you that dramatic color without the weird chemical flavor.
- Easy Spiderweb Design: You don’t need fancy piping skills for this icing. If you can draw a spiral, you can make these webs. I promise.
- Perfect for Halloween Parties: They’re spooky enough for adult gatherings but still kid-friendly. Everyone reaches for the black cupcakes first.
- Cream Cheese Frosting That Holds Its Shape: No sliding, melting webs here. This frosting is sturdy enough to pipe but still silky smooth.
What makes this recipe different from all the other black velvet versions out there? It’s the little things. I add a touch of espresso powder to deepen the chocolate flavor without making it taste like coffee. The vinegar reacts with the baking soda to create a super tender crumb. And the frosting uses a higher ratio of cream cheese to butter, so it tastes tangy and authentic, not just sweetened butter with a hint of cheese.
This is the kind of cupcake that makes people close their eyes after the first bite. It’s comfort food with a spooky twist, perfect for impressing guests without spending hours in the kitchen. You get the drama of a themed dessert and the satisfaction of a genuinely good cupcake. Honestly, that’s the best of both worlds.
What Ingredients You Will Need
This recipe uses simple, mostly pantry-friendly ingredients to create that signature dark, tender crumb and tangy frosting. No weird science experiments here, just smart combinations.
For the Black Velvet Cupcakes
- All-purpose flour, 1 ½ cups (190g) – Spoon and level it for accuracy. Too much flour makes dense cupcakes.
- Unsweetened cocoa powder, ¼ cup (20g) – Use natural cocoa, not Dutch-process. The acidity helps the color develop.
- Baking soda, 1 teaspoon – This reacts with the vinegar and buttermilk for lift.
- Salt, ½ teaspoon – Balances the sweetness and enhances the chocolate.
- Granulated sugar, 1 cup (200g) – Standard white sugar works best here.
- Vegetable oil, ½ cup (120ml) – Keeps the cupcakes moist. Canola or avocado oil also work.
- Buttermilk, ¾ cup (180ml), room temperature – Adds tenderness and tang. No buttermilk? Add 1 tablespoon lemon juice to regular milk and let it sit 5 minutes.
- Large egg, 1, room temperature – Binds everything together.
- Vanilla extract, 1 teaspoon – Pure vanilla, not imitation, for the best flavor.
- White vinegar, 1 teaspoon – Sounds weird, I know. But it reacts with the baking soda for a lighter crumb. You won’t taste it.
- Black gel food coloring, 1 to 2 tablespoons – I recommend Americolor Super Black or Chefmaster. Liquid coloring won’t give you that deep, dramatic shade without ruining the batter consistency.
- Espresso powder, 1 teaspoon (optional but recommended) – Deepens the chocolate flavor without making it taste like coffee. Trust me on this one.
For the Spiderweb Cream Cheese Frosting
- Cream cheese, 8 ounces (226g), softened – Full-fat block cream cheese. Not the spreadable kind in a tub, it’s too soft.
- Unsalted butter, ½ cup (113g), softened – Let it sit out for at least an hour.
- Powdered sugar, 3 to 4 cups (360g to 480g) – Sifted if it’s lumpy. Adjust for desired consistency.
- Vanilla extract, 1 teaspoon – Again, pure vanilla.
- Pinch of salt – Just a tiny one to cut the sweetness.
- White gel food coloring, optional – For a brighter white web against the black frosting.
For the Spiderweb Decoration
- Black frosting, about ½ cup of the batch you just made, dyed black with gel coloring.
- White frosting, the remaining batch, left white or tinted slightly.
- Toothpick or skewer – This is your web-drawing tool.
I’ve tried different cocoa powders for this recipe, and Hershey’s natural unsweetened gives the best color and flavor balance. For the food coloring, don’t skimp. Cheap liquid colors will leave you with grayish batter and a watery consistency. Spend the few extra dollars on gel, it makes a real difference.
Equipment Needed
You don’t need a professional bakery setup for these cupcakes. Here’s what you’ll actually use:
- Standard 12-cup muffin tin – Non-stick is fine, but I still use paper liners for easy removal.
- Paper cupcake liners – Black or Halloween-themed ones look great, but white works too. Avoid foil liners, they tend to peel away from the cake.
- Mixing bowls – One large, one medium. Glass or stainless steel is best.
- Whisk and rubber spatula – For mixing the dry ingredients and folding the batter.
- Hand mixer or stand mixer – For the frosting. You can whisk it by hand, but your arm will hate you.
- Piping bags or zip-top bags – For the spiderweb design. I’ve used both, and honestly, a sturdy zip-top bag with the corner snipped works just as well.
- Cooling rack – Essential for even cooling. Stacking hot cupcakes traps steam and makes them soggy.
- Toothpicks or skewers – For dragging the web pattern.
If you don’t have a piping bag, don’t stress. I’ve made these using a zip-top bag with a tiny corner cut off, and the webs looked just as good. For the frosting, a hand mixer is totally fine. I actually prefer it over my stand mixer for small batches, less scraping down the sides.
Preparation Method
Let’s get baking. This whole process takes about 45 minutes from start to finish, plus cooling time. I’ve broken it down so nothing feels overwhelming.
- Preheat and prep: Preheat your oven to 350°F (175°C). Line your muffin tin with 12 paper liners. This recipe makes exactly 12 cupcakes, no weird half-batch math.
- Mix the dry ingredients: In a medium bowl, whisk together the flour, cocoa powder, baking soda, salt, and espresso powder if using. Set this aside. Make sure there are no lumps in the cocoa powder, nobody wants a bitter pocket of cocoa in their cupcake.
- Combine the wet ingredients: In a large bowl, whisk together the sugar, vegetable oil, buttermilk, egg, vanilla extract, and white vinegar. Whisk until smooth and slightly thickened, about 30 seconds. The mixture will look a little thin, that’s normal.
- Add the food coloring: This is where the magic happens. Add 1 tablespoon of black gel food coloring to the wet mixture and whisk it in. The batter will look dark gray at this point, not quite black. Add the second tablespoon if needed. I usually use about 1 ½ tablespoons for that deep, inky black. Keep whisking until the color is completely uniform. Don’t panic if it looks a bit strange, it will bake up beautifully.
- Combine wet and dry: Pour the dry ingredients into the wet mixture. Use a rubber spatula to fold everything together gently. Mix just until you don’t see any more streaks of flour. Overmixing will make the cupcakes tough. A few small lumps are totally fine.
- Fill the liners: Divide the batter evenly among the 12 liners. I use a cookie scoop for this, about ¼ cup per liner. Fill each about ⅔ full. The batter is quite thin, so don’t worry if it seems runny.
- Bake: Place the tin in the preheated oven and bake for 18 to 22 minutes. At 18 minutes, start checking. Insert a toothpick into the center of a cupcake. If it comes out with a few moist crumbs, they’re done. If it’s wet batter, give them another 2 minutes. The tops should spring back when lightly touched.
- Cool completely: Let the cupcakes cool in the tin for 5 minutes, then transfer them to a wire rack. And I mean completely cool. If you frost them while they’re even slightly warm, the cream cheese frosting will slide right off. I’ve made that mistake before. It’s messy.
- Make the frosting: While the cupcakes cool, beat the softened cream cheese and butter together in a large bowl with a hand mixer until smooth and creamy, about 2 minutes. Scrape down the sides. Add the vanilla and salt, then beat again. Gradually add the powdered sugar, 1 cup at a time, beating on low speed until incorporated. Once all the sugar is in, beat on medium-high for 2 minutes until light and fluffy. If the frosting seems too soft, refrigerate it for 15 minutes.
- Color the frosting: Transfer about ½ cup of the frosting to a small bowl. Add a few drops of black gel food coloring and mix until you get a dark gray or black shade. Leave the remaining frosting white. If you want a brighter white, add a tiny drop of white gel coloring.
- Pipe the base layer: Fit a piping bag with a round tip (or just snip the corner of a zip-top bag) and fill it with the white frosting. Pipe a smooth, even layer over each cooled cupcake. You don’t need to be perfect here, the web will cover most of it.
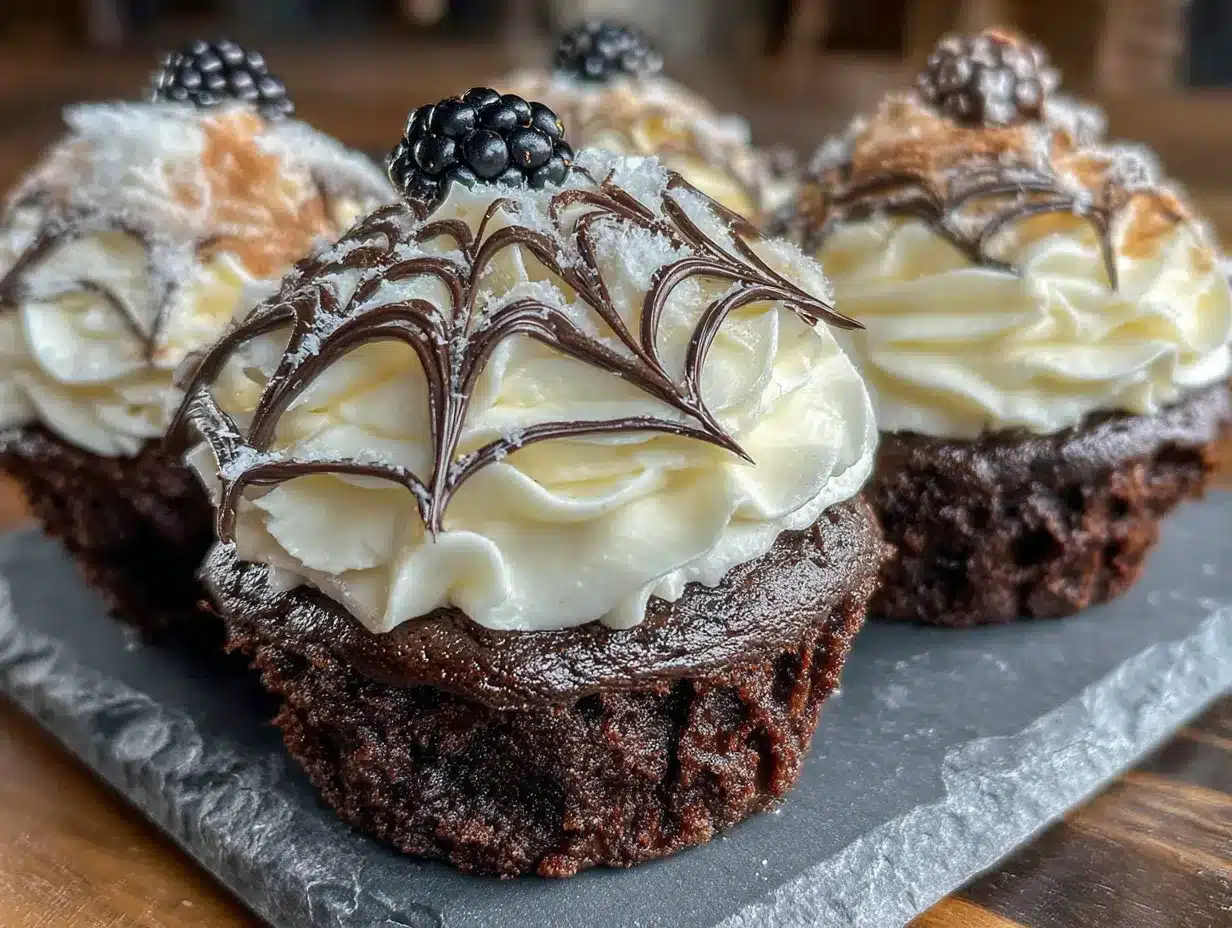
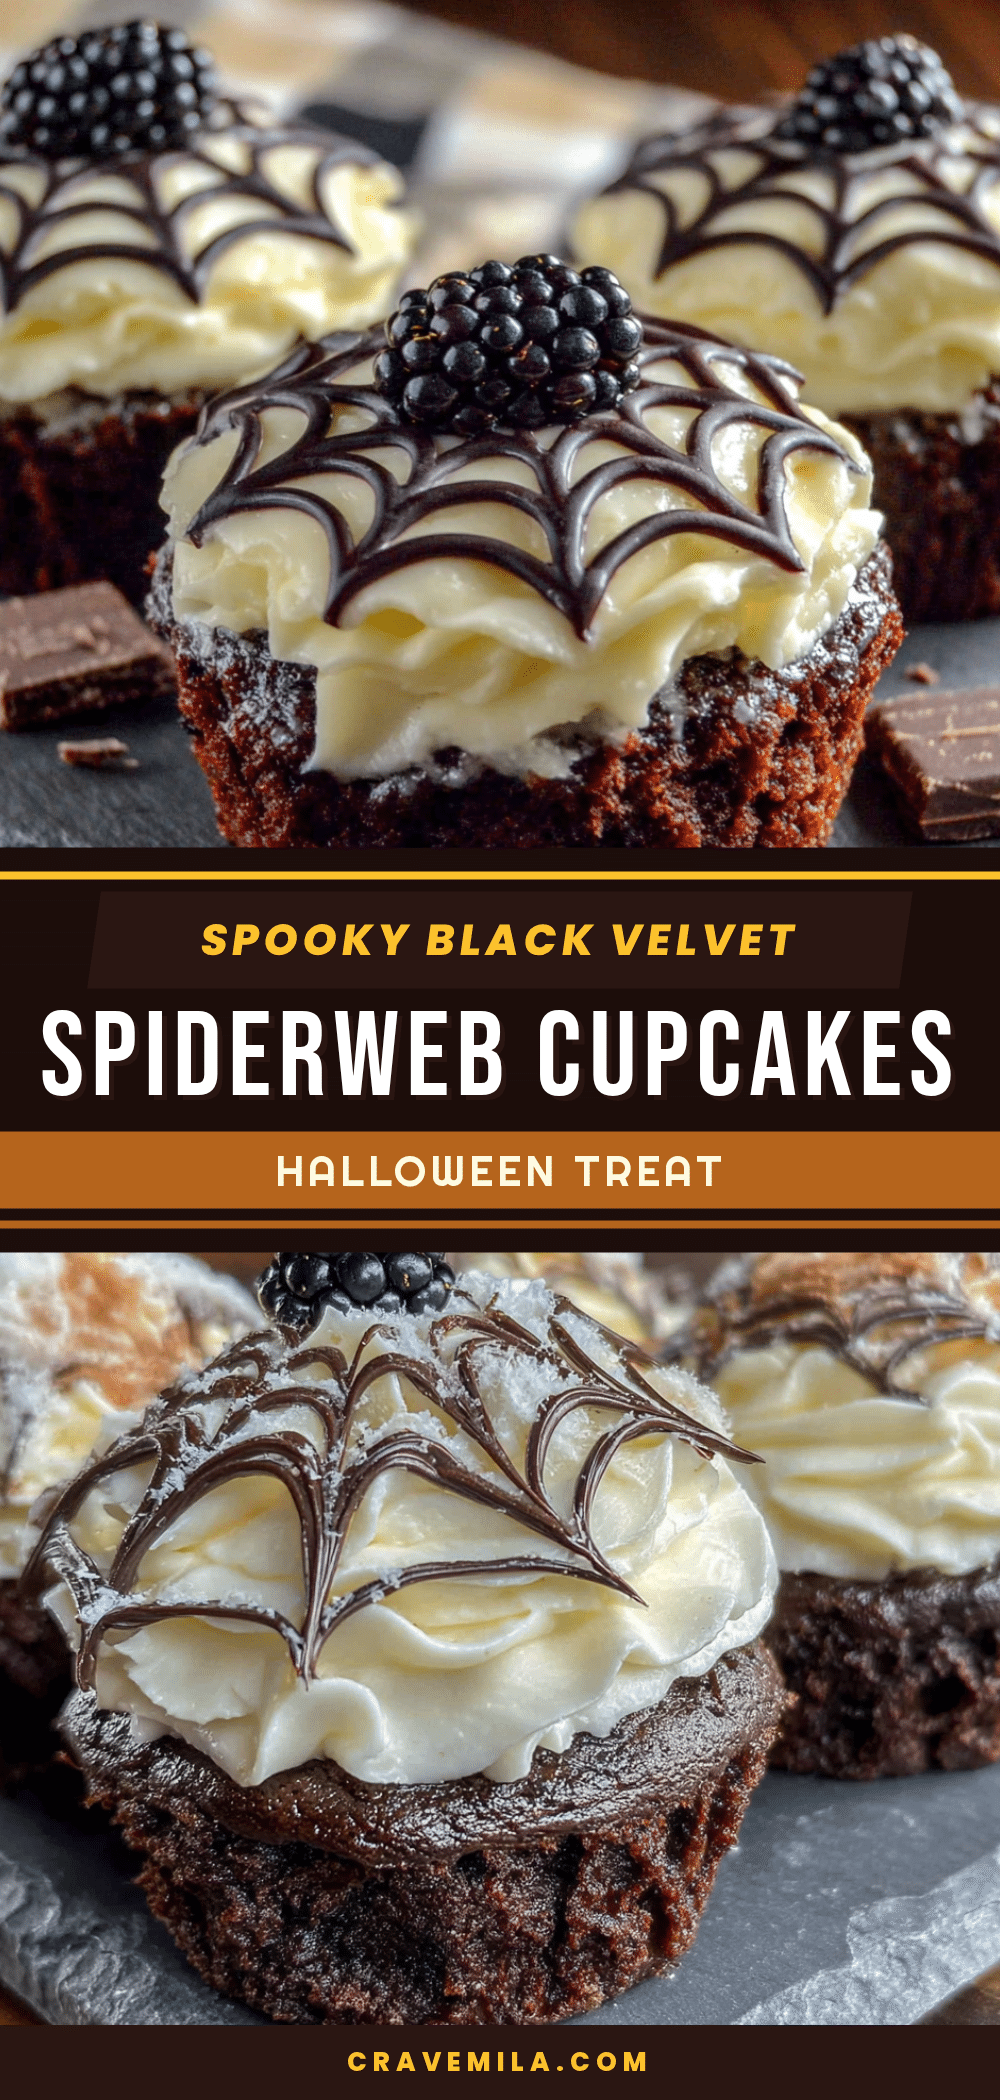
- Create the spiderweb: This is the fun part. Spoon the black frosting into another piping bag. Pipe a small circle in the center of each white-frosted cupcake. Then pipe concentric circles around it, spacing them about ½ inch apart. You should have 3 or 4 rings. Working quickly before the frosting sets, use a toothpick or skewer to drag lines from the center outward. Start at the center and drag to the edge. Repeat every inch or so around the cupcake. As you drag, the white frosting will pull through the black circles, creating a web effect. Wipe the toothpick clean between each drag for the best look.
- Chill and serve: Refrigerate the finished cupcakes for at least 30 minutes to let the frosting set. This makes the webs cleaner and the cupcakes easier to transport.
Cooking Tips & Techniques
I’ve learned a few things the hard way so you don’t have to. Here’s what I wish someone had told me:
Don’t overmix the batter. I know I said this already, but it’s worth repeating. When you combine the wet and dry ingredients, use a light hand. Overmixing develops the gluten and gives you dense, tough cupcakes. You want them tender and soft. Stop mixing as soon as the flour disappears.
Room temperature ingredients matter. Cold buttermilk and egg will seize up the oil and create a lumpy batter. Let everything sit on the counter for 30 minutes before you start. If you’re in a rush, place the egg in a bowl of warm water for 5 minutes and gently warm the buttermilk in the microwave for 10 seconds.
The food coloring will stain your hands. Wear gloves or use a fork to mix it in. I learned this lesson when my hands looked like I’d been handling printer ink for three days. Also, be careful with light-colored countertops and clothing. Black gel coloring is stubborn.
For the spiderweb, work quickly. The frosting starts to set as soon as it’s piped, especially if your kitchen is cool. If the black frosting gets too stiff to pipe smoothly, microwave it for 5 seconds and stir. Not longer, or it will melt.
Test your toothpick drag on a practice cupcake. One ugly cupcake is better than ruining the whole batch. I always sacrifice one cupcake to practice the web pattern. It takes the pressure off and helps you get the rhythm down.
If the frosting slides off the cupcakes, they weren’t cool enough. Pop them in the freezer for 10 minutes before frosting. That usually fixes the problem.
Variations & Adaptations
This recipe is flexible. Here are some ways to make it your own:
Gluten-Free Version: Substitute the all-purpose flour with a 1:1 gluten-free baking flour blend that contains xanthan gum. I’ve used Bob’s Red Mill with good results. The texture is slightly more delicate, so handle the batter gently.
Dairy-Free Adaptation: Use a plant-based buttermilk (almond milk with a splash of lemon juice) and substitute the cream cheese with a dairy-free version like Kite Hill or Tofutti. For the butter in the frosting, use vegan butter sticks, not the spreadable kind in a tub. The frosting will be a bit softer, so chill it longer before piping.
Different Web Colors: Instead of black and white, try orange and black for a more classic Halloween look. Or use purple and green for a witchy vibe. Just use gel food coloring for the best results. Liquid coloring will thin out the frosting too much.
Chocolate Lover’s Twist: Add ½ cup of mini chocolate chips to the batter before baking. They sink slightly and create little pockets of melted chocolate. It’s indulgent but absolutely delicious.
Spice It Up: Add 1 teaspoon of cinnamon and ½ teaspoon of cayenne pepper to the dry ingredients. The warmth of the spices pairs beautifully with the dark chocolate and gives the cupcakes a subtle heat that surprises people.
I once tried a version with peppermint extract in the frosting for a Christmas-meets-Halloween mashup. It was… interesting. Not my favorite, but my niece loved it. So if you’re feeling adventurous, go for it.
Serving & Storage Suggestions
These cupcakes look their best within the first 24 hours, but they taste great for days.
Serving Temperature: Serve them at cool room temperature. Straight from the fridge, the frosting is too firm and the cake loses some of its tenderness. Let them sit out for 15 to 20 minutes before serving.
Presentation Ideas: Arrange the cupcakes on a black cake stand or a dark platter to make the white webs pop. Add some plastic spiders or candy eyeballs around the base for extra spooky vibes. I like to sprinkle a little black sanding sugar over the webs for a subtle shimmer.
Storage: Store the cupcakes in an airtight container in the refrigerator for up to 5 days. The cream cheese frosting needs to stay chilled. Place a sheet of wax paper between layers if you’re stacking them, or the webs will smudge.
Freezing: You can freeze the unfrosted cupcakes for up to 3 months. Wrap each one tightly in plastic wrap, then place them in a freezer bag. Thaw at room temperature, then frost and decorate. The frosting itself doesn’t freeze well, so always make it fresh.
Reheating: If you want that just-baked warmth, microwave an unfrosted cupcake for 10 seconds. Don’t microwave the frosted ones, the webs will melt into a sad puddle. Trust me, I’ve tried.
The flavors actually deepen after a day in the fridge. The chocolate becomes more pronounced, and the tanginess of the cream cheese mellows out. If you can wait, make them a day ahead.
Nutritional Information & Benefits
Let’s be real, these are cupcakes. They’re a treat. But here’s the breakdown so you know what you’re working with:
Per cupcake (based on 12 servings, with frosting):
- Calories: Approximately 380
- Fat: 22g
- Carbohydrates: 44g
- Protein: 4g
- Sugar: 32g
Health Highlights: The cocoa powder is rich in antioxidants, specifically flavonoids that can support heart health. The cream cheese provides a small amount of calcium and protein. The buttermilk adds probiotics, though the baking process reduces their activity. The espresso powder, if you use it, adds a tiny dose of antioxidants and may enhance cognitive focus.
Dietary Considerations: This recipe contains wheat, dairy, and eggs. It can be adapted to be gluten-free or dairy-free using the substitutions mentioned above. It is not suitable for vegan diets in its current form.
Allergen Note: If you’re serving these at a party, be aware that they contain common allergens. I always label them clearly when I bring them to gatherings, just to be safe.
Look, I’m not saying these are health food. But if you’re going to have a cupcake, having one made with real ingredients and a bit of cocoa’s natural benefits is better than a box mix loaded with preservatives. Balance, right?
Conclusion
These Spooky Black Velvet Cupcakes with Spiderweb Icing are the Halloween treat that actually delivers. They look dramatic and creepy, but they taste like comfort and chocolate and everything good about fall baking. The deep black crumb, the tangy cream cheese frosting, the satisfying moment when you drag that toothpick through the icing and watch a web appear it’s all worth it.
I love this recipe because it proves that themed baking doesn’t have to be a compromise between looks and flavor. You can have both. And honestly, watching someone’s face light up when they see that spiderweb, then close their eyes in pleasure after the first bite, is one of my favorite things.
I’d love to hear how yours turn out. Did you try a different color scheme? Add a fun filling? Leave a comment below and share your spooky creations. And if you’re looking for more Halloween baking ideas, don’t miss my creepy crawly cookies or these pumpkin patch brownies. Happy baking, and may your webs be perfectly spooky!
Frequently Asked Questions
Can I use liquid food coloring instead of gel?
You can, but I don’t recommend it. Liquid food coloring will thin out your batter and frosting, and it takes a lot more to achieve a deep black color. You’ll end up with grayish cupcakes and a watery frosting that won’t hold the web pattern. Gel coloring is more concentrated and gives you that dramatic shade without messing with the texture.
Why did my spiderweb icing turn into a blurry mess?
This usually happens when the frosting is too soft or the toothpick drag is too slow. Make sure your frosting is chilled enough to hold its shape, and work quickly when dragging the lines. Also, wipe the toothpick clean after each drag. If the frosting starts to blend together, pop the cupcake in the fridge for 10 minutes and try again.
Can I make these cupcakes ahead of time?
Absolutely. Bake the cupcakes up to two days in advance and store them unfrosted in an airtight container at room temperature. Make the frosting and decorate them the day you plan to serve them. The webs look best when fresh, and the frosting stays creamy.
My cupcakes turned out dry. What went wrong?
Two common culprits: overbaking or overmixing. Check your oven temperature with an oven thermometer, as some ovens run hot. And remember to stop mixing as soon as the flour disappears. Overmixing develops gluten and leads to a dry, tough texture. Also, make sure you’re measuring your flour correctly by spooning it into the measuring cup and leveling it off.
How do I get the black color really dark without using too much food coloring?
Start with a good quality dark cocoa powder, like Hershey’s Special Dark. The darker the cocoa, the less coloring you need. Also, let the batter sit for 10 minutes after adding the coloring. The color deepens as it sits. If you’re still not happy, add another teaspoon of gel coloring. Just don’t go overboard, or the batter can get a slight chemical taste.
Pin This Recipe!
Spooky Black Velvet Cupcakes with Easy Spiderweb Icing
These Spooky Black Velvet Cupcakes with Spiderweb Icing are the Halloween treat that actually delivers. They look dramatic and creepy, but they taste like comfort and chocolate and everything good about fall baking.
- Prep Time: 15 minutes
- Cook Time: 20 minutes
- Total Time: 45 minutes (plus cooling and chilling time)
- Yield: 12 cupcakes 1x
- Category: Dessert
- Cuisine: American
Ingredients
- 1 ½ cups (190g) all-purpose flour
- ¼ cup (20g) unsweetened cocoa powder (natural, not Dutch-process)
- 1 teaspoon baking soda
- ½ teaspoon salt
- 1 cup (200g) granulated sugar
- ½ cup (120ml) vegetable oil (canola or avocado oil also work)
- ¾ cup (180ml) buttermilk, room temperature
- 1 large egg, room temperature
- 1 teaspoon vanilla extract (pure vanilla)
- 1 teaspoon white vinegar
- 1 to 2 tablespoons black gel food coloring (recommend Americolor Super Black or Chefmaster)
- 1 teaspoon espresso powder (optional but recommended)
- 8 ounces (226g) cream cheese, softened (full-fat block cream cheese)
- ½ cup (113g) unsalted butter, softened
- 3 to 4 cups (360g to 480g) powdered sugar, sifted if lumpy
- 1 teaspoon vanilla extract (for frosting)
- Pinch of salt (for frosting)
- White gel food coloring (optional, for brighter white web)
- Black frosting (about ½ cup of the batch, dyed black with gel coloring)
- White frosting (remaining batch, left white or tinted slightly)
- Toothpick or skewer (for web-drawing)
Instructions
- Preheat your oven to 350°F (175°C). Line your muffin tin with 12 paper liners.
- In a medium bowl, whisk together the flour, cocoa powder, baking soda, salt, and espresso powder if using. Set aside.
- In a large bowl, whisk together the sugar, vegetable oil, buttermilk, egg, vanilla extract, and white vinegar until smooth and slightly thickened, about 30 seconds.
- Add 1 tablespoon of black gel food coloring to the wet mixture and whisk it in. Add the second tablespoon if needed (I usually use about 1 ½ tablespoons). Keep whisking until the color is completely uniform.
- Pour the dry ingredients into the wet mixture. Use a rubber spatula to fold everything together gently, mixing just until no streaks of flour remain. Do not overmix.
- Divide the batter evenly among the 12 liners, filling each about ⅔ full (about ¼ cup per liner).
- Bake for 18 to 22 minutes. At 18 minutes, insert a toothpick into the center of a cupcake; if it comes out with a few moist crumbs, they’re done. Let cool in the tin for 5 minutes, then transfer to a wire rack to cool completely.
- While the cupcakes cool, beat the softened cream cheese and butter together in a large bowl with a hand mixer until smooth and creamy, about 2 minutes. Scrape down the sides. Add the vanilla and salt, then beat again.
- Gradually add the powdered sugar, 1 cup at a time, beating on low speed until incorporated. Once all the sugar is in, beat on medium-high for 2 minutes until light and fluffy. If too soft, refrigerate for 15 minutes.
- Transfer about ½ cup of the frosting to a small bowl and add a few drops of black gel food coloring until dark gray or black. Leave the remaining frosting white (add a tiny drop of white gel coloring if desired).
- Fit a piping bag with a round tip (or snip the corner of a zip-top bag) and fill with white frosting. Pipe a smooth, even layer over each cooled cupcake.
- Spoon the black frosting into another piping bag. Pipe a small circle in the center of each white-frosted cupcake, then pipe concentric circles around it, spacing them about ½ inch apart (3 or 4 rings).
- Working quickly, use a toothpick or skewer to drag lines from the center outward, starting at the center and dragging to the edge. Repeat every inch or so around the cupcake. Wipe the toothpick clean between each drag.
- Refrigerate the finished cupcakes for at least 30 minutes to let the frosting set before serving.
Notes
Don’t overmix the batter to avoid dense cupcakes. Use room temperature ingredients for best results. Wear gloves when handling black food coloring to avoid staining. Work quickly when creating the spiderweb design. If frosting slides off, cupcakes weren’t cool enough; pop them in the freezer for 10 minutes before frosting. For gluten-free, use a 1:1 gluten-free flour blend with xanthan gum. For dairy-free, use plant-based buttermilk and dairy-free cream cheese and butter.
Nutrition
- Serving Size: 1 cupcake
- Calories: 380
- Sugar: 32
- Fat: 22
- Carbohydrates: 44
- Protein: 4
Keywords: Halloween cupcakes, black velvet cupcakes, spiderweb icing, cream cheese frosting, spooky desserts, themed baking



